Have you ever wanted to start your server on Minecraft and open it publicly? With this tutorial, you will learn how to create a Minecraft server for Java Edition and host it on your own. This guide is specially made to help you setup a Minecraft Server on Windows and host it on your own.
What Do You Need to Set Up a Minecraft Server?
To start a server, you will need to understand the minimum server requirements.
Since this guide is about setting up and hosting a Minecraft server locally, we will need to have:
- Windows Operating System
- At least 4 GB of RAM installed
- Static IP address
- CPU for running your server
- A stable internet connection
While Minecraft does not require or use any GPU resources, it requires you to have a CPU installed. The CPU can be single-threaded or multi.
It’s a myth that Minecraft servers require multi-threaded cores, so you don’t need to worry. A CPU with more than one core could be useful for some plugins, but not mandatory.
However, if you want to run your Minecraft server on a multi-threaded CPU, you can use Folia.
How to Make a Minecraft Server
To make a server and host it yourself, we have enlisted 9 easy-to-follow steps.
Setting up takes no more than 5 minutes, and after following the steps, you will be able to connect and start playing.
Download and Install Java
The first and most important part before making your server is installing Java. Depending on your server version, you will need a certain Java Update to be installed.
For Minecraft servers 1.12 or below, you will need to have Java 8. Everything above will require the latest version of Java.
To download Java, you will need to navigate to the Java official website and choose the proper version.
Download Minecraft Server
To make a Minecraft server on a Windows PC we need to download software. In this case, we will be showing how to make a server using the Minecraft Vanilla Jar.
Head over to the Minecraft server hosting page, and download the server jar.
The file contains the plain server jar file. Make sure to download the latest version for hosting your server. You can also use alternative Minecraft server jars such as Spigot, Bukkit, or even Paper. It all depends on your preferences and needs.
When downloading the Minecraft server jar, you will need to create a folder. Make a special Minecraft server folder and save the Jar file in the server folder.
Create a start batch file for the server
To start the Minecraft server jar, we will need to create a batch file. This file will be the trigger to start your server.
The first step to creating this file is to create a simple Txt file. The name of the file does not matter.
Open your newly created Txt file and paste the following code:
java -Xms2G -Xmx4G –JAR_NAME.jar -o true
PAUSE
Now proceed to save the file. Simply choose the option “Save As”, and name your file “run.bat”.
After clicking the save button, you will be granted a batch file. It is used to trigger the Minecraft server jar and install the basic components.
Start the Server
To begin the setup, we will need to install the default server files. Double-click on the batch file and wait for the files to start generating.
Agree to the EULA
Upon the file generation process, you will encounter a specific EULA message. This message requires you to accept the Mojang EULA. If you don’t accept it, your server will never start. This way if you find someone that does not abide by the EULA, you can report the Minecraft server to Mojang directly.
To accept Mojang’s EULA, open the EULA text file, and change the last line to “true”.
Launch The Server
Now that we have set the EULA on for our server, we can run the server.
Double-click on your batch file and wait until the server starts running.
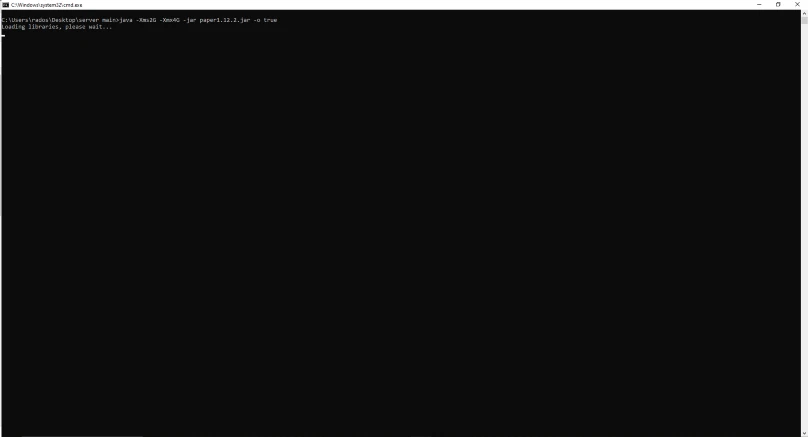
Once everything loads, you can connect to your server via “localhost” or by using your external IP address.
Connect to the server
To connect to your server, you will need to open your Minecraft launcher. Choose the correct version of Minecraft. It should be the same as your server version.
Launch your Minecraft game and head to the multiplayer section. Click on “Direct Connect” to connect using your external IP.
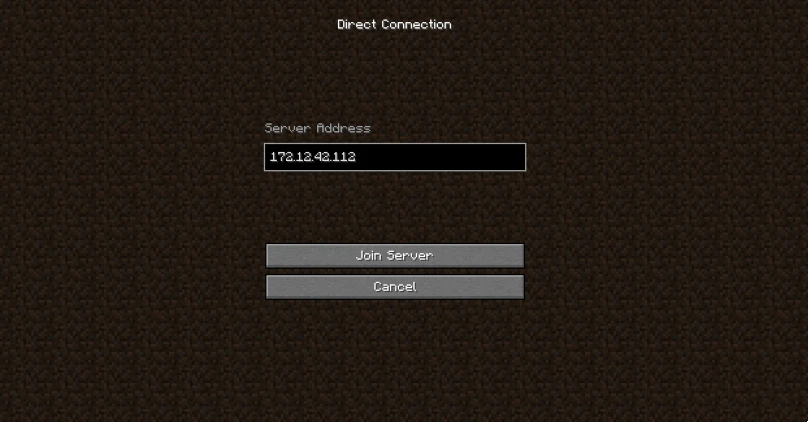
Obtain your external IP Address by searching for “What’s my IP”, and input it in the “Server Address” field.
Press the connection button, and you will be able to join your server. With the external IP people outside your network can connect, and start their Minecraft experience.
Giving OP permissions on your Minecraft Server
Since you will be the head of your server, you will need full permissions. With these permissions, you can use various commands, and restrict players.
To give yourself full permissions, you will need to access the server console. Once you have navigated to the console (operator), type “OP player_name”. The “player_name” needs to be replaced with your in-game name.
The OP permission lets you operate your Minecraft server as an administrator.
How to set up a Minecraft server and open it publicly
If you want people to connect to your server, you will need to make it public. This will require opening the Minecraft server ports from the router.
Without your ports being open, only the people in your network can connect. Port forwarding allows people to access your home network, and join.
A port forward is required to access your router to open certain ports. If you cannot port forward you can create a server with PlayIt.
Once you have acquired your port and IP address, the next step is to attach them to your server.
Navigate to your server properties file to place the IP for the forwarded port. When the information is filled out, save your server settings and exit out of the config.
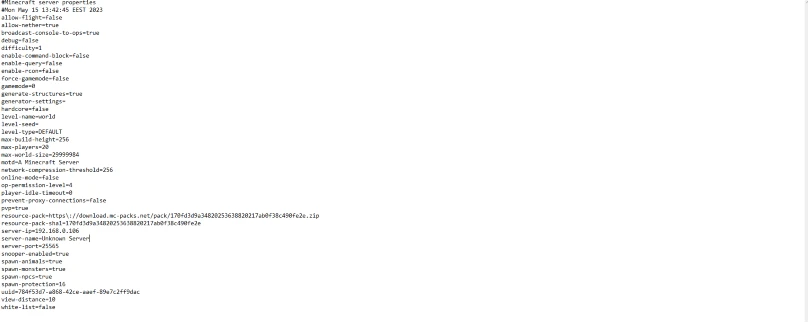
When sharing your IP address you must give it in the form of IP followed by the port number. In that case, if our IP is 123.123.123 and the port number is 25565, our server’s IP address should be 123.123.123:25565.
With the IP and port, you give access to players to join your server and play.
Recommendations to setup a Minecraft Server for popularity
Add a custom server icon
Changing the server icon is an important step for any owner. It’s a way to brand your server and start earning the player’s trust. Especially, when you have a custom server icon, that represents the server and its name.
Set a custom MOTD
Before releasing your Minecraft server to the public, you will need to set an MOTD. It can be used for announcing updates or using catchy texts.
Without a message, your players will not see your server professionally.
Configure max player amount
Setting a max player for Minecraft servers can be beneficial. It helps you get protected from bots and unwanted attacks. Also, it gives players an understanding of how many players can join.
Otherwise, you may see your server constantly crashing if too many people join. If your server maintains a lot of players, use a higher number. This will depend on the plugins or mods you are using as well.
Make sure to test thoroughly and ask friends to join before setting it up. You can always change the number so it’s best to be cautious in the beginning.
Create server saves
Minecraft servers require constant saving. Especially when players progress on it. If your server gets corrupt, everything might be lost. In such cases, it is best to configure Minecraft saves, and backup whenever possible.
Doing so will prevent file loss, and you can always revert to previous saved versions.
Set a restart script for your server
Minecraft servers crash sometimes, and you may not be home when this happens. To prevent a large downtime it is best to set restart scripts.
With these scripts, every time your server crashes, it will restart and start running.
Setting up a Whitelist for your Minecraft Server
The very next thing you may want to do is set up a Minecraft server whitelist. While it may sound strange, whitelists are helpful in many ways.
Every time you want to develop your server or place updates, the player may just pop in and interfere. With whitelisting enabled, players will not be able to join, unless invited.
Whitelists are very helpful for server owners who want a private Minecraft server, perform updates, rollbacks, or even make changes without interference.
Add startup flags
Startup flags are commonly used for RAM allocation and operation. They keep a server healthy and create RAM reserves, so your server doesn’t crash.
It is a common fact that Windows takes unused RAM. Without setting up flags, your server might not have enough memory to upkeep itself.
The same goes for cache and garbage collection. When Minecraft players log in or log out, the cache gets saved. If too many actions happen, your server might run out of RAM quickly. Flags can also prove helpful in such cases by dumping the cached files.
The best way to configure flags for your server is through Aikar’s Flags tutorial.
It contains useful flags and scripts to help you prevent your server from trouble from overloading.
Add plugins to your Minecraft server
Now that you have everything set, it is time to start installing plugins on your Minecraft server.
There are more than 60,000 developed Minecraft plugins for servers, from which you can choose any (if it’s compatible with your server version) and add them to your plugins folder.
Minecraft plugins can be downloaded from repositories like Spigot or Bukkit.
You may find that some plugins are asking for a certain price. These are paid plugins, which require players to pay real money to acquire them.
Minecraft Server Setup FAQ
Are Minecraft Servers free to make?
Yes, Minecraft servers are free to make and don’t require any subscriptions or payments. You can freely download anything you like, and Mojang will not charge you for that.
However, running your Minecraft server will require your computer to be turned on all the time.
Can I make money with my Minecraft server?
You can make money with your Minecraft server. If you abide by the EULA, you can safely get income for running a server.
But to earn money you need to have something players might want to pay for. For example, a donations plugin can help you earn money.
Can I change my Minecraft IP address with a custom name?
If you want to use a custom Minecraft server name, you will need to change your IP with a domain name. This happens by setting your DNS records. Your server’s IP address will need to point to your domain.
This way players can join your server without exposing your IP.
Can I make Multiple Minecraft Servers with the same IP address?
You can create multiple Minecraft servers with one IP, but you will need to assign a different port. If there is a server running on port “25565”, you cannot use the same port.
To prevent errors, you will need to create a port “25566” and run the server under it. Having more than one server under the same IP is considered a Minecraft server network.
Linking all servers together can boost your authority, and make your projects more appealing.
How much RAM does a Minecraft server need?
Depending on the player’s capacity, you will need to allocate RAM for your Minecraft server. If you create a small server, you will need around 4 GB of memory.
However, if you want a modded server, you may need to allocate more of your RAM.
You can also optimize your Minecraft server for efficiency, and avoid tps spikes.
Conclusion
Hosting your own Minecraft server may seem hard. Upkeeping also.
While upkeeping your server may seem like a chore, it can be a fun one. Especially, when you can automate a big portion of the duties.
However, if you don’t have the time to set up one from scratch, you can always buy a premade Minecraft server setup.
It is up to you to choose the Minecraft version and the type of server you want to host.