Purchase MineLabz Donations for $1 with code "newstart" for the first month or $19.95 for a year Subscribe Now
So you have purchased the MineLabz donations plugin, and need help setting it up? In this guide, we will show you the whole installation and setup process.
Before you start, make sure your website has no plugins installed by your hosting provider (e.g. SG Optimizer, Hostinger AI, etc).
The donation system consists of 2 components, which are separately installed, and later hooked. Make sure you have downloaded both files from your purchase. If not, you can always head back to your account, and then visit the downloads section.
Grab the WP installation file of MineLabz, and go to the plugins section on your WordPress website. Choose “add new plugin”, then from the top, select the “add plugin” option.
Once the plugin has been selected, choose the install option, and then activate it.
Afterward, head over to the “add new” plugin section, and search for Woocommerce. You need to have the plugin installed, for MineLabz to start working.
The download file for your Minecraft server requires you to follow the process of installing Minecraft plugins. Once the process has been followed, simply start your server, and wait for it to fully load.
After the server has been loaded, stop it, and review your plugins folder. You should see the MineLabz folder.
From there, you will need to hook the Minecraft and WordPress plugins together. You can use both subdomains, addon domains, and main domain names for this process.
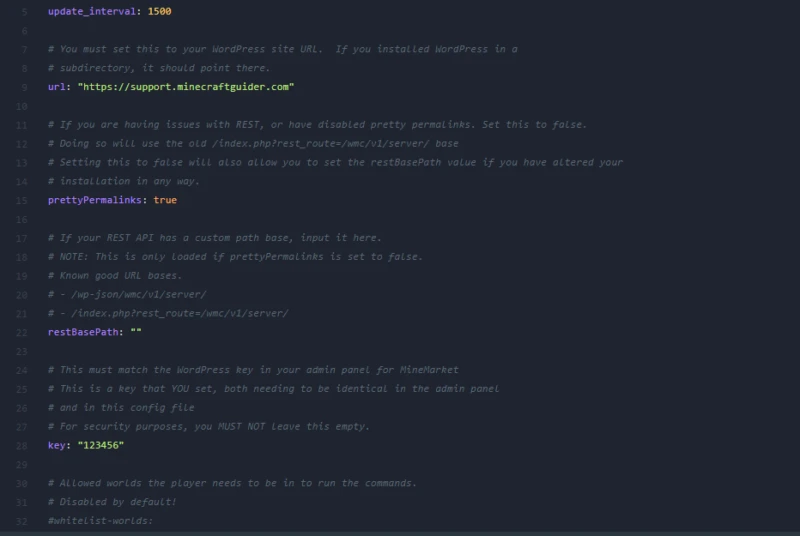
To get started, open the config.yml of MineLabz, and fill in the URL of your website.
Afterward, create a secret key, which can be anything. This key acts as an encrypted connection to your website and is required. There are no limitations to secret keys.
Once you have added your website and created a key for hooking up both plugins, you will need to go to your WordPress admin dashboard.
Go into WooCommerce, then Settings, and scroll down to the bottom. Locate the text MineMarket Options.
Under the MineMarket options, you will see 2 fields – Dropdown Label and Key.

The Dropdown label can be used to filter between your Minecraft servers (applicable for server networks).
The Key field should contain the key previously created in your config.yml file.
Once the action has been completed, you will need to stop the HPOS from Woocommerce. This option will ensure that the REST API is working.
MineLabz has only 2 commands, which are executed from your Minecraft server.
/mreceive – a command, which players will have to use so that they can receive their bought items. Once a player has ordered the items and uses /mreceive, the server will execute the command.
/mping – a command, which lets server owners (OP’s and admins) check if the plugin is hooked up properly. For the plugin to work, you should be seeing status 200 for both your website and the API.

Rad is the lead writer for the MineLabz team, dedicated to writing content for Minecraft enthusiasts. Combining Minecraft and Marketing, Rad creates all kinds of articles for the server development community.